2013-08-16
UPDATE: Serial commands and timing information are now available here.
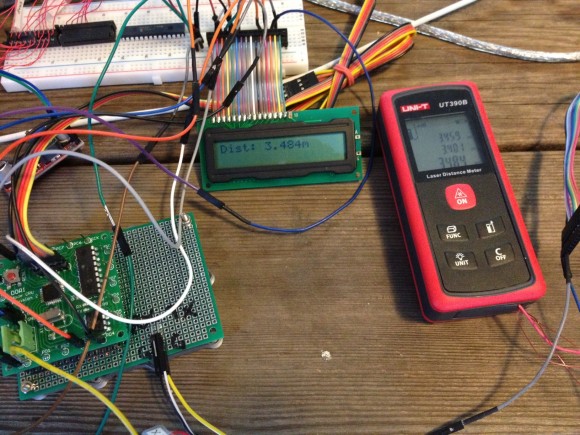
This is a follow-up on my previous article about an arduino-compatible laser distance meter with serial output. I've received several emails asking for example code to parse the serial output.
int strstart_P(const char *s1, const char * PROGMEM s2)
{
    return strncmp_P(s1, s2, strlen_P(s2)) == 0;
}

int getdist(void)
{
    char buf[64];
    char *comma;
    int dist;
    int rc;

    for (;;) {
        rc = Serial.readBytesUntil('\n', buf, sizeof(buf));
        buf[rc] = '\0';

        if (!strstart_P(buf, PSTR("Dist: ")))
            continue;

        comma = strchr(buf, ',');
        if (comma == NULL)
            continue;

        *comma = '\0';

        dist = atoi(buf + strlen_P(PSTR("Dist: ")));
        return dist;
    }
}

void setup(void)
{
    Serial.begin(115200);
}

void loop(void)
{
    int dist_mm;
    int dist_m;
    char buf[128];

    dist_mm = getdist();
    dist_m = dist_mm / 1000;

    snprintf_P(buf, sizeof(buf),
        PSTR("Laser distance: %d.%dm"),
        dist_m, dist_mm % 1000);

    Serial.println(buf);
}
Hi, Any furthur info on Laser Range Finder ?
Regards
Mike
What kind of info do you need?
Any progress on sending it commands?
Any idea of how fast you can pulse the 'on' line and get reliable results?
some experimenting showed that:
sending char 'r' powers down the system, all other characters except * and # are echoed back.
the device seems to accept commands in form: *xxxxx#
where x are numbers. the last number defines the action: i think it accepts only numbers with 5 digits.
*43531# outputs:
*00021012#pMsgWrite TRUE
pInitDataWrite TRUE
*11112# turns on laser and does 3 readings, but display shows "Er":
Dist: 428,curtemp =18
V2.0
nDist: 428,tempDv=0
Dist: 428,curtemp =18
V2.0
nDist: 428,tempDv=0
Dist: 428,curtemp =18
V2.0
nDist: 428,tempDv=0
u32Dist[0]=428 u32Dist[1] =428 u32Dist[2] =428
u32temp =0
*000720150000000042#
*54343# does nothing
*11114# does a single reading, and displays on lcd. BINGO:
Dist: 525,curtemp =18
V2.0
nDist: 525,tempDv=0
*55555# dumps some data:
772*0024500001000022430000000000000000000000000000000040#*0024500002000009340000000000000000000000000000000019#*0024500003000007830000000000000000000000000000000067#*0024500004000009530000000000000000000000000000000040#*0024500005000002980000000000000000000000000000000079#Hi! How often can this setup read out data? once per sec?
This information would interest me also because i can find no information about it.
Andrew,
I managed to combine some of the things discussed here so I can now turn it on (NPN), take a reading (serial), shut it off (serial), and capture all of the output (serial).The problem I am having it that it is challenging to parse the output (just providing mm). I tried using your method but it doesn't work for me. Is there a simple way that I can search the stream for ": " (colon & space)? or something like that? - The value follows those two characters. - The serial command also comes back with a response that is a bunch of leading zeros and the distance value that I am looking for. So, either of these are fine but it seems like it should be simple to do and yet I am having a very very hard time doing so.
Any thoughts?
....
void loop(void)
{
thisUpdate = millis();

if (thisUpdate >= (lastUpdate + interval)){
// Turn the device on using an NPN transistor
subRecord(); // call the routine to take a reading
}

// Serial.print("I should turn off now");
if (thisUpdate >= (lastUpdate + interval+TimeToTakeReading)){
subOff(); // turn it off
lastUpdate = thisUpdate;
}

//This is how I am reading the data continuously
if(Serial1.available()){
char inByte = Serial1.read();
Serial.write(inByte);
}
}

////////////Sampling the Serial line for a value
void subRecord(){
Serial1.write("*11114#"); //*11114# does a single reading, and displays on lcd. BINGO:
Complete = true;
}
/////////////Turning off
void subOff(){
Serial1.write("r");
Complete = false;
}
Results are
ldpara:368
curent ver:420411
Year:Jan 21 2013 Time:13:53:10
ldpara:368
Iint OK
GetAPDMinVoltage ÿAPDMIN=186 APDMAX=224
BIASVOLMIN=2311 BIASVOLMAX =2323
(
Dist: 3192,curtemp =18

V2.0
nDist: 3192,tempDv=0

*0006400000319269#See my updated post here: http://blog.qartis.com/laser-distance-meter-update-serial-commands-timing-measurements/
Short answer: about 1 measurement per second for single-shot mode, and about 3 measurements per second for rapid-fire mode.
Hi,
Could you tell me how could you turn it on?
Thanks in advance!
Tom
Did you find a datasheet or something with these commands or was it trial and error? Just wondering if it was trial and error how many of the different combinations you tried?
Trial and error. After finding out chars * and # are not echoed back, it took me about 15 tries to figure out the pattern. In short, it was pure luck 🙂
Ok sweet, Did you just pick random combinations withing the chars * and # or did you run through a list of them?
Just wondering whether its worth me having a hack at some code that scrolls through all the *xxxxx# combinations to see if there are any other ones
hello
From : http://y6-multicopter.blogspot.ru/2014/03/blog-post.html
the shown code is working in rapid fire, but i whant a one second interval shot
boolean recdata = true;
boolean data;
int buf[64];
int rc=0;

void setup()
{
Serial.begin(115200);
Serial1.begin(115200);
//Serial.println("Start...");
}

void loop()
{
static unsigned long t = 0;
if (millis() > (t + 2000)){ // timer start when no data from the sensor
Serial1.write("*00084553#");
t = millis();
}
getdist();
if (recdata) t = millis(); // Reset the timer when it receives data from the sensor
}

int getdist(){
int litera;

if (Serial1.available() > 0){
while (Serial1.available() > 0){
litera = Serial1.read();
if (litera == 42) { // If adopted a "*"
data = true; //Then set the sign of the beginning of the packet
}

if (litera == 35) { // If adopted, the "#"
data = false; //Then set the sign of the end of the package ...
recdata = true; //And install a sign to obtain data for the control (reset) the timer and further processing of the packet
}
if(data==true && rc47){ // If there is a sign of the beginning of the packet, the packet length is reasonable and litera has a numeric value to ASCII, the ...
litera = litera-48;// convert ASCII to figure ...
buf[rc] = litera; // And add it to the array.
rc++;
}
}
}else{
if (recdata == true){
boolean dig=true; //This variable will work to separate the package into categories 2 digits
int countdata=0; //This variable will be considered level
int data=0; //This variable will take the values of bits
int sum=0; //This sum of all digits except for the last
int src=0; //This is the last category (10), which defines the checksum
int countLaser=0; //This is an internal counter in the 5th digit
int dist=0; //It is the distance, we calculate
for(int p = 0; p<rc; p++){
if(dig){
data = buf[p]*10;//Here we have the first sign of any new discharge multiply by 10 ....
countdata++;
}else{
data += buf[p]; // And here we add to it, the second value.
if(countdata= 100) {// If the checksum is greater than 99, then cut off the excess, leaving only the last two
int a=sum;
sum=sum/100;
sum=sum*100;
sum =a-sum;
}
if(sum==src){// If the amount of bits (except the last) is the checksum (last digit) then ...
// Serial.print(" ");
// Serial.print(sum);
// Serial.print(" ");
// Serial.print(src);
Serial.print("t");
Serial.print(countLaser); //Output data of the internal counter
Serial.print("t");
Serial.print(dist);//Output the distance and ...
if(countLaser==99){// if the counter has reached the limit, then ...
Serial1.write("*00084553#"); //give the command to start a new cycle
}
}
src = 0;
countdata = 0;
countLaser = 0;
rc=0;
recdata = false;
Serial.println();
}
}
}hello andrew i want to ask about how did u discover all these info about that module coz i have GLM50 bosh and i want to connect it with my MCU and i don't know from where i can start .
Hi, I know it's been a while, but did you ever work out what command would change the "base" measurement distance from base of unit to top of unit etc?
Thanks,
sorry, i haven't encountered such command.
but you can add or subtract the size of the lasermeter from the measured value 🙂
No problem.
That was my plan.
I've still not found the combination either.
Has anyone else noticed the unit appears to be out by about 2cm - it is consistent though, so again I can subtract it from the equation.
Andrew,
I have a remote controlled lawnmower that I would like to convert to a robotic mower. You can view my mower at:
http://www.instructables.com/member/Bob+Bowie/
I am familiar with BASIC programming and have purchased a Basic Stamp.
By programming the Basic Stamp, I can control the wheel chair motors (i.e., forward, reverse, and time in motion).
As the mower moves, I need to know its position (x,y coordinates).
I see that you have an article, "Parsing laser distance meter serial output". I am hoping that you might be able to show me how to parse the laser meter using the Basic Stamp.
Here's a link to the Basic Stamp:
Basic Stamp Activty Kit
BASIC Stamp Activity Kit - USB (Text v3.0) | 90005 | Parallax Inc
Video:Parallax Perspective: BASIC Stamp Activity Kit
https://www.youtube.com/watch?v=55Ugmctwoig
BASIC Stamp Editor Software
https://www.parallax.com/downloads/basic-stamp-editor-software Please email me at: bbowie@yahoo.com
Thank you, Bob Bowie